Tuesday, 21 May 2019

Repairing a Damaged Windows 7 Installation

Every operating system needs an occasional fix, and Windows 7 is no exception. No matter if the source of the problem is corrupted files, particularly aggressive malware or
another serious problem, occasionally you will have to reinstall your copy of Windows.
Formatting the HD and doing a "scratch" installation can be a problem since you will need to spend a lot of time later with updates, restoring backups and reinstalling programs. But fortunately there is a way to repair a damaged Windows 7 installation and still keep your programs, personal files and user accounts intact, using a feature called "In-Place Upgrade." Although technically designed to upgrade from previous versions like Vista, it is also effective as a repair tool.
The process involves multiple steps, including an initial "clean-up" to make sure everything runs smoothly. Note that the process needs to be done from Windows itself. If your PC can not even load the system, then this tip is not for you.
There are some other limitations that we will mention later in the article, so read this entire guide before trying the process on your PC. Doing a repair installation should be your last option, and it is only something to consider if you have already tried removing spyware from your PC, upgraded drivers and attempted, unsuccessfully, to return to a previous copy of the system using System Restore.
Prepare your PC
Before starting repairs, take some steps to make sure the process runs smoothly. The first is to back up any important files on an external hard drive. While the repair process is unlikely to fail or make your files inaccessible, it's always good to be careful.
After the backup, we recommend uninstalling any security applications, such as firewalls and anti-virus. We have to do this because as they monitor the machine for modifications to system files, they can disrupt copying of new files (from the installation DVD) over the old files on the hard drive. After the upgrade you can reinstall the programs. As a precaution you should also download and save (on a CD or Pendrive) all the necessary drivers for the operation of your computer, especially the network drivers, essential for your internet connection.

After backing up, remove the temporary files and other "junk" that may have accumulated in the system after an extended period of use. To do this click the Start Menu, type folder in the search field and select the Folder Options item in the results. In the window that appears, click on the View tab and check the Show hidden files, folders or drives option and click OK.

You will need to delete some hidden files before reinstalling Windows

Now do a disk cleanup. Click the Start Menu and select Computer. Right-click on your main HD (usually C :) and select the Properties item from the menu. In the window that opens, click the Disk Cleanup button on the General tab. Wait for the disk to be scanned and click the Clean System Files button. Wait for a new scan.
Now click the More Options tab and click the Clear button under System Restore and Shadow Copies. In the window that appears, click Delete. Then go back to the Disk Cleanup tab, check the boxes in front of all the items in the list and click OK. The utility will get rid of old versions of system files, temporary files and other digital junk. Depending on how much junk is accumulated on your hard drive, this can take anywhere from a few seconds to several minutes.

Depending on the machine, Disk Cleanup can free up several GB of space on the hard drive.

After all this, there are still some folders from which you will have to get rid manually. Click the Start Menu, click Computer, double-click the C: drive, and open the Windows folder. Delete anything that is inside the Prefetch and Temp folders. Do not delete the folders, just the contents of them. Then go back to C: and open the Users folder. Open the folder with your user name and inside it the AppData folders, then Location, then Temp. Delete everything inside and restart the PC.
Install Windows 7
Once the preparation is complete, it's time to start reinstalling Windows. You will need a DVD installation system with the same version already installed on your PC and at least 10 GB of free space on the hard drive. The installation disc needs to be "cleaned", meaning recovery discs that came with your PC, customized by the manufacturer, will not work.
Insert the installation DVD into the drive, click Run Setup.exe, and then the Install Now button. You will have the option to Connect to receive the latest updates for the installation or Do not get the latest updates for the installation. If your internet connection is working, it is better to connect. Then accept the license terms and choose whether to perform an Upgrade or a Custom installation. Since we are repairing an installation already exists, choose the update.
Although most of the data and programs installed on your "old" copy of Windows 7 should be seamlessly transferred to the new one, some things like custom themes and sounds will not be migrated. You will have to reinstall them later.
"Clean" after installation
After the upgrade is complete, you will need to activate the system and answer some basic questions (date and time, network settings, etc.). At the end of this process Windows will measure the performance of the machine to give it a score in the Windows Experience Index (IEW) and make some final updates and fixes. After that, go around the system and make sure that all your files are in place and that your applications are working properly. Also, run Windows Update to ensure that your system has the latest updates installed.
Finally, get rid of the garbage left by the old copy of Windows 7. These files will be in two system folders, called $ INPLACE. ~ TR and $ WINDOWS. ~ Q in HD. If everything is ok, you can delete these two folders. Also repeat the steps we described earlier to do a disk cleanup and that's it.
Congratulations, you've brought your Windows 7 back to life with success. Keep this guide handy in case you have to repeat the process.

This article is accurate and true to the best of the author’s knowledge. Content is for informational or entertainment purposes only and does not substitute for personal counsel or professional advice in business, financial, legal, or technical matters.

How to Manually Remove Computer Viruses Without Antivirus Software


Do I Have a Virus? My Computer is Acting Weird!
If your computer is acting weird—displaying pop-ups from programs you've never heard of, showing your desktop icons running away from your computer mouse, or suddenly running terribly slow—your computer may be infected. These behaviors are more often than not a sign that a computer virus, worm, or other malicious software has managed to sneak past your firewall and anti-virus program.
You should definitely run a virus scan on your computer to see if the virus or worm can be detected; nevertheless, as my own experience shows, malicious software can hide from even a well-known anti-virus program. You may end up having to manually search for the invading software and remove it yourself, if you are trying to avoid a system restore, and this article will show you how to do that.
Neither malicious software nor anti-virus programs are created equal. In fact, this past August I was attacked by one of the most vicious Trojan horses created, fFollower.exe (well, the most vicious and evil Trojan I've come across).
All of a sudden I got a popup telling me to click to install "Windows Updates." Clicking the popup caused my computer to restart. Then a window opened saying something about "fFollower.exe," whatever that was, with a little picture of a devil. While I was pondering that, the window disappeared, and the next thing I knew, System windows, Internet Explorer windows, and JavaScript windows were popping up so fast my head was spinning. I almost thought I was in a scene from the Exorcist. The Trojan was creating more and more illegitimate processes, flooding the computer with useless tasks. I could predict the outcome ... a computer running slower and slower until the eventual and inevitable crash.
Time was running out for Ace (my computer has a name), and with every minute that passed, Ace was closer to death, I could just see it.
But what luck, I thought; I had just signed up with a new internet service provider, and received Norton AntiVirus Online from them. I started the Norton virus scan. I waited. Norton crawled along, and finally reported nothing but a tracking cookie. Evidently, my luck was out.
What could I do? Put Ace out of his misery? Or look online for a solution?

Computer viruses can quickly leave you with no other option then to shoot your computer.
Computer viruses can quickly leave you with no other option then to shoot your computer. | Source
So I searched the Web, and found software called Malwarebytes, which claimed to remove malware, spyware, adware, key loggers, and Trojans that most well-known anti-virus programs failed to detect. That was what I needed, I thought, so I downloaded a free version.
And Malwarebytes delivered: with just the "Quick Scan" option, it picked up a total of 40 computer viruses, worms, Trojans, spyware, and other malicious files that Norton Antivirus didn’t even have a clue about. Later I did a full system scan with Malwarebytes, and found 13 more viruses, including that evil Trojan fFollower.exe.
The full version of Malwarebytes, which I ended up buying, includes not only scheduled scanning and updating but real-time protection against hackers trying to break through your firewall. This real-time protection has prevented so many hacker attacks on my computer on a daily basis that I can’t even keep track of them.

Another Discovery: Threat Expert

While I was searching online regarding how to get rid of my computer virus, I also found Threat Expert, which anyone who owns a computer should know about, in case your virus protection software fails or is not available. This web site analyzes and reports the behavior of computer viruses, worms, Trojans, adware, spyware, and other security-related risks. These reports are useful for hunting the suckers down yourself, as they tell you the file names and aliases created, processes created, registry keys created, and other information about the virus.

Need to Manually Remove a Computer Virus Without Virus Protection Software?

I am a research junkie who loves to research anything and everything that crosses my path. However, on a computer, researching everything that crosses one's path is risky behavior, and I have suffered the consequences a few times. At times I have manually removed malware, like this Trojan horse, viruses, key loggers, and adware, because I did not have the money to keep my Norton Antivirus software updated as often as the manufacturers want us to.

Before We Start Our Malware Search-and-Destroy Project

Depending on the programming of the virus, spyware, adware, or other unwanted program, it may be possible to remove it yourself from an infected computer. However, it can be a long, tricky process, and can damage your files if some step does not work exactly as planned.
Therefore, I strongly recommend that before you go through the steps below, you do what you can to back up the information you have in your computer. If you don't have a complete back-up, follow the instructions below at your own risk.
Ideally you should always have a complete back-up of your computer. The back-up allows you to run a system restore, which will restore your computer to a previous state if all else fails. (And in addition a back-up will help you identify any new files that you did not install, which may be malicious.)
I also must advise you also that using good virus protection software, like Malwarebytes, to remove malware is faster and safer for your data.

Five Easy Steps to Remove Viruses and Other Malicious Software

1. Know Your Enemy

Any great war general will tell you to know your enemy, get inside their head, think like they do, act like they do, and become their best friend, as this will prepare you to overcome your enemy. So engage with the virus: keep an eye out for any security messages that pop up, as these usually provide the exact name of the virus that has infected your computer. If it gives you a security message that says "For More Info Click Here," or something else to click on, and it is not asking you to enter personal financial information or install anything, you may want to go ahead and click on it. Be prepared to write down any product name it gives you, or any file name and directory path (example: C:\Users\YourUserName\AppData\LocalLow\Temp\Virus). Remember, NEVER give out your personal financial information in these dialogues with malware.
Now if you were lucky enough to catch a security message and get the name of the virus itself, then you can continue on to Threat Expert and get all the information you can on that malicious software.
If you were only able to get a product name, then you need to do a search on it. Most likely, you’ll find out that the product is "fakeware" (malicious software that calls itself an anti-virus program).
In your search, it's a good idea to pursue results that link you to a forum, as you may find the information you need in discussions there, for example the name of the virus infecting your computer.
Once you have the name of the virus and the report from Threat Expert you can begin the hunt. It won't be a long hunt if you were able to get the directory from the "security" message, because that is where that little malicious bugger is hiding.

2. Block the Virus from the Startup List

You can’t kill the virus unless you put it to sleep first. So to put the virus to sleep we will end all the processes created by the virus.
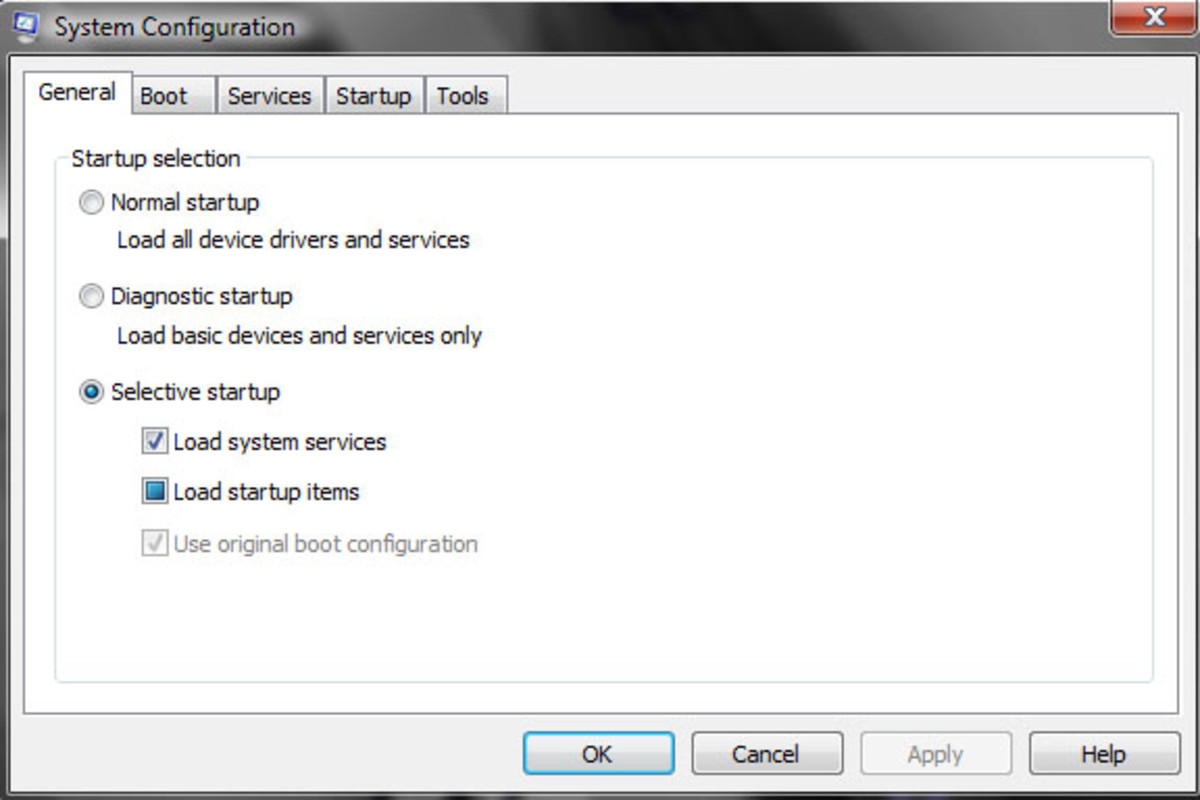
A first step is to block the malicious program from starting itself up along with your usual programs every time your computer starts up. You can use System Configuration ("msconfig") to do this. One way to do this is to click the “Start” button on your desktop, type "System Configuration" into the "Search" field, and select “Start System Configuration” from the results. Or find it by clicking "Start," then "Control Panel," then "System and Security," and then "Administrative Tools," and then double-clicking "System Configuration.‌"


System Configuration is great for helping with virus removal, allowing you to keep the virus turned off when you start up again.
System Configuration is great for helping with virus removal, allowing you to keep the virus turned off when you start up again. | Source
System Configuration opens the "General" tab, where you will need to select the circle next to "Selective Startup." Next, move to the “Startup” tab and go through the list there: select all the programs that have an unknown manufacturer and disable them, because programs with unknown manufacturers are almost always malware. Restart your computer to close any currently-running versions of the malware.

Source

3. Start Task Manager and End Virus-Related Processes

When your computer restarts you will open your Task Manager immediately, which can be done quickest by pressing the "Ctrl," "Alt," and "Delete" keys all at the same time and then selecting "Start Task Manager" from the options that appear. Select the “Processes” tab and then compare the processes listed as running on your computer to the list of virus-created processes you got from the Threat Expert report or other research. Any processes running on your computer that match the ones on the report need to be ended, until all virus-created processes are gone.

Source

4. Seek and Destroy That Malicious Software: Delete Its Files

Now we will go to the directory where the virus is and delete the virus. Tip: viruses like to hide themselves inside your “Temp” folder. If you got the directory path from the security message the virus gave you, then all you need to do is open up your computer's Explorer window and follow the path. For example, if you were looking for "C:\Users\YourUserName\AppData\LocalLow\Temp\Virus…" you would click on the "C" icon in Explorer, for the computer's hard drive, then click the “Users” folder, then click the “YourUserName” folder, and so on, until you get to the virus. Now delete any file names that match those on the virus report.


5. Seek and Destroy Some More: Remove Registry Keys

Finally, we will go into the Registry and remove the registry keys the virus put in. To go into the Registry, click the “Start” button on your desktop, click “Run,” type "regedit," and click "OK." Or type "regedit" in the search bar on your Start Menu, and select the Regedit program from your search results. You can find the exact name and directory path of the registry keys created by the virus from the Threat Expert virus report. Delete the registry keys that the virus created--do be careful to delete the exact keys you have in mind, no others--and you should be virus-free.

Source

Congratulations! Now Change Your Passwords

Now that the malware is removed from your computer you need to change your passwords. You do not know what private information of yours the malware may have scraped from your keystrokes, or from the wonderful little cookies you gather from all the web sites you visit, and you don't know to whom the malware may have sold this information. So please remember to change all of your passwords once the virus has been removed.

This article is accurate and true to the best of the author’s knowledge. Content is for informational or entertainment purposes only and does not substitute for personal counsel or professional advice in business, financial, legal, or technical matters.
How to Remove Broken Windows Updates

When Windows Update Goes Wrong
Microsoft releases regular updates for Windows 10, and most of those updates are beneficial, providing new features, security updates, and performance enhancements. However, things can sometimes go wrong. Either the update is not compatible with your hardware, or the update comes with bugs that make your system difficult or unstable in day to day use. When that happens, the best idea is usually to remove the update (known as 'rolling back'), and then prevent Windows from installing it again, so that your system stays stable.

How to Roll Back a Windows Update

To roll back a Windows Update, the first step is to boot into Safe Mode. This is a limited diagnostic mode that loads only the most essential features of Windows.
In Windows 7 and earlier versions, you can access safe mode by pressing the [F8] key while the system is booting up. In Windows 8 and Windows 10, you can access safe mode by holding down the <Shift> key while clicking the Restart option. This will put you into the Windows recovery environment, where you can select See advanced repair options, and then select Troubleshoot, then Advanced options and Startup Settings. Finally, click Restart.
From here, you will be taken to a new version of the Advanced Boot Menu. This will show several options. Press the key to load the standard Safe Mode.

Hold down the Shift Key and select Restart to access advanced boot options such as Safe Mode.

Uninstalling Windows Updates

Once you have booted into Safe Mode, you will see an environment that looks quite similar to your usual Windows desktop, however the screen resolution may differ, and you may not have access to your usual hardware and programs. You will also not be connected to the Internet unless you selected Safe Mode With Networking.
You can uninstall Windows Updates by opening the Programs and Features tool (search for it under the Start Menu), and clicking on 'View installed updates'.

Finding Out What Windows Updates You Have Installed


Select View Installed Updates from the left hand side of the Programs and Features screen.

Installed Updates


This will take you to a list of updates that you have installed.

Finding the Problematic Update

You can sort the list of installed updates by date. This is useful because it means that you can find the most recently installed updates. It's logical that the problems with your computer will most likely have been caused by one of those recently installed updates.
Once you have found the most recent update, you can right-click on it, and select Uninstall to remove it.

Removing Windows Updates When Your Computer Won't Boot

If your computer will not even boot up, then you can still remove Windows Updates by using System Restore. In fact, System Restore is useful for fixing a huge number of issues with Windows, including rogue programs, problems with drivers and more. System Restore will roll your Windows installation back to an earlier time when Windows had taken a snapshot of all of the important files and configuration data.
System Restore will only be available to you if you have it enabled. The good news is that it is enabled by default, and you would have to go out of your way to turn it off. For most users, it is recommended that you keep System Restore turned on, since it does not impact the performance of your computer and it uses only a small amount of hard drive space to save those snapshots of your computer. Having System Restore available to you can be invaluable in the event that something does go wrong.

Will I Keep My Files if I Use System Restore?

One thing that a lot of people worry about when they use System Restore is what will happen to their work.
Windows System Restore puts your computer's programs and configuration files back to the state it was in at the time the snapshot was taken. This means that it will fix driver issues, and solve problems with a part of Windows called the Registry, which is where a lot of important configuration information is stored. It does not affect anything that is stored in the My Documents folder. Your emails, word processing documents, presentations, photos, videos, music and other similar files - including things like saved games - will be unaffected. This means that you can try System Restore without worrying about losing those files. There is no guarantee that System Restore will work - if your computer's problem is down to damaged hardware, or corruption on the hard drive, then System Restore may not help you. However, trying it should not make your issues any worse.
Remember, also, that if you use Windows 10 and save important documents to your One Drive folder, then they will automatically be backed up, so you can recover those documents even if you have to reinstall the entire PC.

Using System Restore

To use System Restore, follow the process that was provided above for accessing the Advanced Options part of the boot menu, then select System Restore. This will bring up a screen that asks you what System Restore data you want to use. In most cases, it is best to select the Recommended restore. This will put your system back the way it was before the most recent changes were made.
Note that using System Restore will not only uninstall the latest Windows Update, it may also uninstall any drivers that were installed after the snapshot was taken, as well as any programs that you have installed recently.

To use System Restore select the top left icon in the Advanced options section of the boot menu.

How to Block a Windows Update You Don't Want

If you remove a Windows Update and discover that your computer works well again, then you won't want to have that update installed again. On Windows 7 and Windows 8, you can block updates that you do not want by opening the Windows Updatescreen (search for it by hitting the Windows key and typing Windows Update), and right-clicking on the update that you do not want, then selecting Hide update.
Hiding the update will stop that update from being automatically downloaded and installed. If, at a later date, you decide you want to try it again, you can always open the Windows Update screen and then download and install the update manually. You can achieve something similar using the Show or hide updates troubleshooter package for Windows 10, which is a free download from Microsoft.
If you want to avoid the Fall Creators Update, or other similar major versions update, then there is a little-known workaround which will stop Windows from automatically downloading those updates. You can set your computer's internet connection to 'Metered'. There is no guarantee that this will always work, but to date Microsoft's policy has been to not have major version updates auto-download for users who are on metered net connections.

How to Set Your Connection to Metered to Block Major Windows Updates

To set your connection to metered, click on Start Settings Network & Internet. Next, if you have a wired connection (called an Ethernet connection), select Ethernet on the left hand side of the screen, then select the network icon, and click on Set as metered connection so that it shows On.
If you have a wireless connection, then you can do the same thing - simply select Wi-Fi instead of Ethernet then follow the same procedure.

This article is accurate and true to the best of the author’s knowledge. Content is for informational or entertainment purposes only and does not substitute for personal counsel or professional advice in business, financial, legal, or technical matters.

Photo and File Recovery on a Laptop

                  Broken Laptop


Has your computer died?
Has your computer died? | Source

Photos and Documents Can Be Retrieved

Has your laptop taken a turn for the worse, and taken your photo's and documents along with it?
My old laptop is pictured above. I tried to keep it working for as long as I could. When the keys were popping off, I figured, who needs them? I can type without looking (for the most part). The charging plug came out, and a wire broke, no problem, I hardwired it. It was stepped on, breaking the screen. I thought, "Isn't that what remote screen is for?" I still used it every day, until one day, it wouldn't boot up.
I know, I know, why didn't I back up my files long ago? When the keys started popping off, it would have been a good idea. When the charging plug broke, it would have been a great idea. When the screen cracked, it would have been a stupendous idea. But I didn't. And when it died, it took everything with it!
But there is a happy ending to this story! All of the photo's and documents can be retrieved!
I used a SATA/IDE hard drive attachment.
Here are the steps I took to remove my hard drive and get the files off of it.

Remove the Hard Drive

You can pull your documents and photo's right off of the hard drive! There is an attachment wire that is needed to read the hard drive, and it isn't very expensive at all.
With the attachment wire, you can also use the hard drive as an extra, external, hard drive to store your documents and photos.
Here's what you do (you can follow along with the photo's below):
  1. Flip the laptop over and remove the battery. The .gif below is a general configuration of a laptop battery. There are usually two, maybe one, slide that when pressed in the correct direction, the battery will be released.
  2. Locate the cover panel for the hard drive. It may have an impression of stacked CDs on it. Using a screwdriver unscrew the retaining screws and remove the panel You will see the hard drive under the panel (.gif below).
  3. Manufacturers have different methods of securing the hard drive in your laptop. Even the various models can have a different configuration. Take a good look at yours and determine if it is screwed in, pressed in, or in a sleeve or frame of some sort. Sometimes a frame will be screwed or pressed in. To remove the hard drive, you have to remove the frame first, with the hard drive inside of it.
  4. Detach the plug connecting the laptop to the hard drive.
Great!! You have the hard drive out! You're half-way there.

Remove The Battery


Remove the battery.
Remove the battery. | Source

Remove The Hard Drive Cover


Set Up the SATA

If you look at the wire set on the side of the hard drive, you will notice either a set up of pins or a flat bar with several connectors. Depending on your type of laptop use the appropriate connection.
Now attach the set up to a working laptop or computer using the USB attachment.
There may be a power switch on your cord to power on the hard drive once connected. Make sure the green light is illuminated. It won't work unless the hard drive has power.

Sata Set up

Click thumbnail to view full-size
Motherboard with pins.Motherboard with flat strip.Wires to connect Sata.Pin type connector.Pin connector connected.Flat type connector.Adapter set up.

Motherboard with pins.
Motherboard with pins. | Source

New Drive In Your Folders


Attach the SATA Device

When you're all set:
  1. Turn your working computer on.
  2. Go to your files folder or computer folder.
  3. There will be another drive now. It may be named F:/ or G:/ or whatever according to what your computer already has.
  4. Click on the folder and all of your documents, photo's and various folders will be presented just like it was on the computer that broke!
You can copy them to another drive or keep them right where they are at and use the hard drive as an external folder for saving your things to. It's safe, has a large storage capacity and convenient if something happens to your current computer you have it backed up!

This article is accurate and true to the best of the author’s knowledge. Content is for informational or entertainment purposes only and does not substitute for personal counsel or professional advice in business, financial, legal, or technical matters.c

5 Symptoms of a RAM Problem and How to Fix It

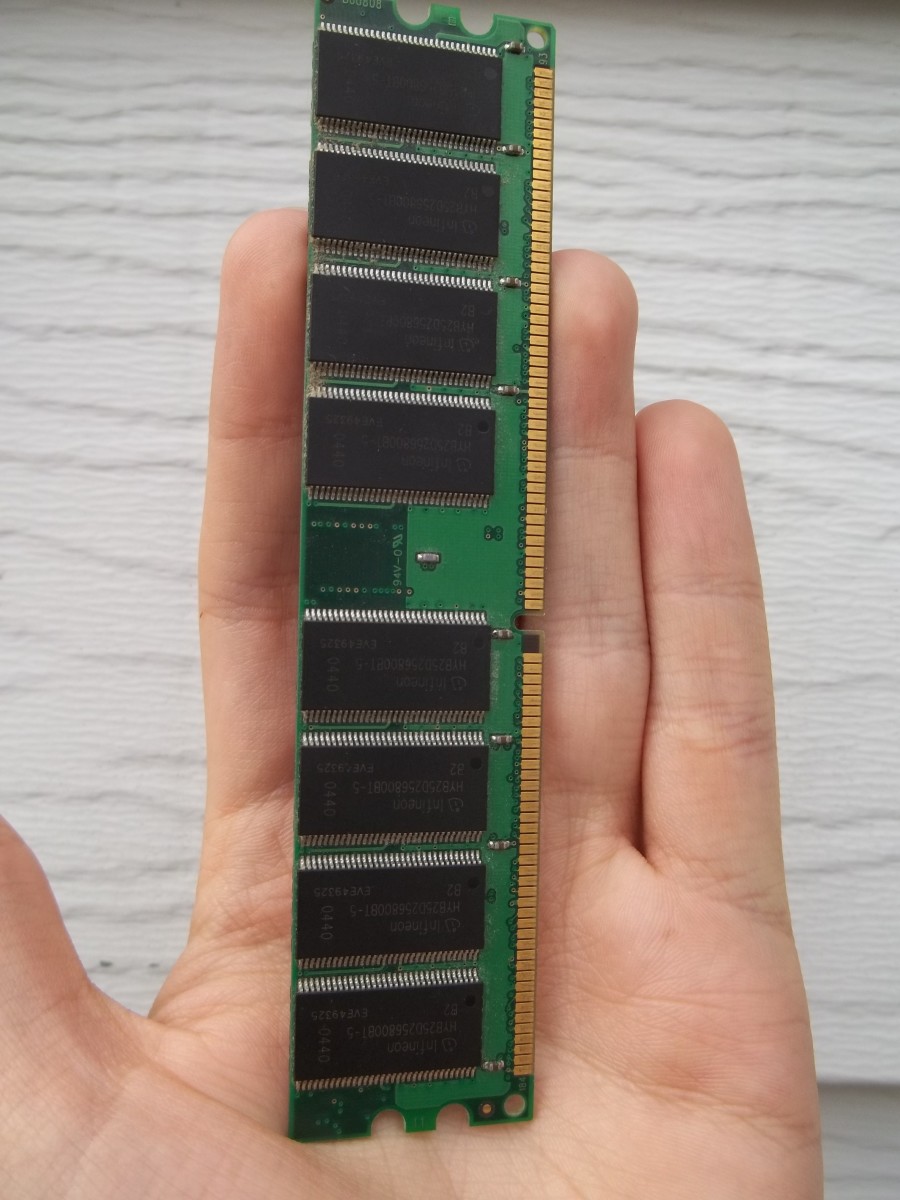
      What does a RAM stick look like?


What does a RAM stick look like?

What is RAM?

Random Access Memory, or RAM, is a way for your computer to store temporary data, rather than in a cache or permanent storage. Storage, often wrongly referred to as memory, is permanent data stored on a hard drive or solid state drive. A CPU cache is a small amount of often-needed memory that is stored on a CPU chip. Both the RAM and CPU cache are temporary data stores that are cleared when your computer is turned off.
One way to think of the difference between these different types of storage is to imagine them as paper documents. The cache is a list of names or numbers you constantly refer to and keep close at hand. A folder full of papers you may need for your current task is similar to computer memory or RAM. The file cabinet full of folders for all your projects is like the storage on your hard drive.
Memory problems are less common than other computer problems because memory sticks have no moving parts and thus fewer points of failure. However, due to this many RAM problems go undiagnosed. Memory usually will last longer than other computer components so manufacturers offer longer warranties for it than other parts. If you buy brand name memory it will likely have a lifetime warranty.

Symptoms of a RAM Problem

  • When you first turn on your computer it runs fine, but as you go about your business you notice that its performance diminishes. By lunch time, websites take minutes to load and local programs run at a snail's pace. This type of gradual deterioration of PC performance, especially with memory-intensive programs, may be caused by a RAM problem.
  • Your computer randomly restarts while you are in the middle of something or freeze sporadically. It may also reboot almost immediately upon opening the desktop. This could be a sign of faulty RAM.
  • A blue screen with white text flashes before restarting. Blue-screen errors are annoying because you don't even have a chance to read the error message. Bad RAM is one thing that cause them.
  • Files—particularly ones you frequently access and save—seem to be inexplicably corrupted. RAM issues can lead to this problem, which can worsen over time. The file structure of your hard drive may slowly degenerate and you will no longer be able to boot your machine.
  • Your attempts to install a new program repeatedly fail for unknown reasons. You try to reinstall the operating system, but keep getting odd error messages.
There are certainly a variety of problems that could cause the issues above, but faulty RAM is an often-overlooked root cause of inexplicable issues. If you have one or a combination of the above problems you are likely facing a memory issue.

What Causes Memory Damage?

  • Power surges can damage most computer components, including RAM. You should plug your computer and other expensive electronics into a surge protector. Make sure you know the difference between a surge protector and a power strip.
  • Before you handle any parts in your computer, make sure you ground yourself by touching a piece of grounded metal to discharge static electricity. Electrostatic discharge can damage your computer.
  • Excessive heat can cause RAM and other parts to wear out over time. Individual components can overheat, or heat from one component can cause damage to adjacent parts.
  • If you have overclocked any part of your computer incorrectly, it may cause damage in the form of excess heat.
  • Your memory module may have some fault that passed through quality control and worsened over time. This is the most likely cause behind a damaged RAM.
It is also possible that the memory module is fine, but one or more memory slots on your motherboard are defective, hindering the RAM's performance. The defect may even be so bad that it damages the
memory stick .


Diagnosing the Problem
  • If the symptoms started after you recently added more memory, the new module could be faulty. This seems obvious, but any time a problem begins after making a change, first check to see if the change caused the problem.
  • Your computer may produce multiple beeps or a continuous beep when you turn it on. These beeps can indicate many different problems, including being a symptom of bad RAM. Beep codes vary depending on the manufacturer of your BIOS. You can look up the beep codes for your specific computer to figure out its specific problem.
  • If you are not comfortable fixing your computer yourself, I recommend taking your computer to a local repair store rather than a big retail store. Big stores are in the business of selling additional parts, not fixing problems.
  • If you are an advanced user, there are diagnostic programs that can help you figure out if you have a memory problem. Your computer may have one pre-installed by the manufacturer or you can download a third-party program. The Windows Memory Diagnostic by Microsoft is also good if you suspect memory problems on a Windows PC.
  • If the above programs indicate your memory sticks are functioning, but you still suspect a RAM problem or if you need to find which memory module is the problem, you can try removing the modules and placing them in different slots.

Installed RAM


What installed memory modules look like.
Memory modules, pictured in the image above, are small circuit boards that lay perpendicular to the motherboard. Note that I removed many of the other components to make the memory more visible. If your computer has more than one module you should remove all of them except one and then run the diagnostic tests above or perform the task that normally causes the problem.

Fixing the Problem by Removing Memory

  • To remove a RAM module you need to press the tiny levers on each end to release it.
  • Test each of your memory modules one at a time to find which ones are bad. When you find the sticks that are bad you can order replacements. It is possible all the memory modules are damaged if your computer experienced a serious power surge.
  • If all the memory modules appear bad, then the problem is likely with the memory slot itself. Try testing each memory module in each of the memory slots to find if one of the slots is faulty. To fix a faulty slot you would need to replace your motherboard.
  • When replacing a module, make sure the indention on the bottom is lined up correctly with the slot and then press it in until you hear the levers snap. Note that some levers do not make a snapping sound.

RAM Slot Levers


The levers for the memory slot are white in this example.

Other Possible Problems

RAM problems often go undiagnosed, but they also can be misdiagnosed. Some common problems that have nothing to do with memory can cause the symptoms listed above:
  • Many of the symptoms listed above can actually be caused by a hard drive problem. You can run a utility called CHKDSK by pressing the Windows button and R at the same time, typing CHKDSK into the dialog box, and pressing enter. Alternatively, you can click on Computer, right-click the drive you intend to scan, click Properties, then the Tools tab, and click Check now. Note you will need to restart your computer. Also, be aware this process may take an extended amount of time to finish running. If you hear your hard drive making lots of noise during normal operation, it may be the cause of your problems. Defragmenting your drive every few months is a good idea as well.
  • If the performance problems occur during graphic-intensive programs such as games or rendering, your graphics driver could be outdated. Be sure to always keep your drivers up to date.
  • Excessive heat in your machine can cause a variety of problems.
  • Random reboots can be cause by a failing power supply.
  • Dirt and dust can also cause issues that look like memory problems. It is a good idea to clean dust out of your computer at least once a year, more often if you have furry pets.
  • Your computer can also have a virus. Note that many people automatically assume any problem with their computer is caused by a virus and many large retail repair stores frequently misdiagnose hardware problems as viruses. Make sure you have a good anti-virus program and run scans on a regular basis.

About Me

I became interested in computers at a young age and took formal computer repair classes. I repair computers on a regular basis for family, friends and friends of friends. I have also worked in technical support and repair roles for various companies.

This article is accurate and true to the best of the author’s knowledge. Content is for informational or entertainment purposes only and does not substitute for personal counsel or professional advice in business, financial, legal, or technical matters.